
January 27, 2026
Vibe coding AI Study Camp's LMS in two weeks
Using the same tech stack we teach in our Vibe Coding Foundations class, I set out to build AI Study Camp’s own learning management system (LMS). It took two weeks, cost less than a typical SaaS subscription, and solved a real problem for our team.
Why I decided to vibe code an LMS
At AI Study Camp, we’ve been managing each student's learning program through live Google Docs — manually releasing syllabi on a weekly basis, creating folders, sharing access. It’s worked, but it takes ~45 minutes per week per 8-10 students and doesn’t scale. So I decided to vibe code our own Learning Management System (LMS).
The catch: I'm not a programmer. I built the entire thing using Claude Code and the same tech stack we teach in our Vibe Coding Foundations class — Next.js, Instant, GitHub, VS Code, and Vercel.
Two weeks and $200 later (my existing Anthropic Pro subscription), we have a working MVP that we’ll launch in our January cohorts. Our goal is that this LMS will not only save us hours of admin work, but also create a more delightful experience for our students.
This essay walks through what I built and how — with the hope of showing what's possible when you have a versatile vibe coding toolbox.
Let’s start with a visual walkthrough
Before we go into how we built AI Study Camp’s LMS, let’s showcase what we built. This visual walkthrough is segmented based on our two user flows: (1) students and (2) admin/instructors.
All Users
All users sign up via Magic Link authentication, powered by Instant (authentication has historically been a pain point for app builders; with Instant, this takes <2min to set up!).
Student Flow
The student home page displays the course or courses a learner is enrolled in, along with a clear progress bar to track completion.
When a student clicks into a course, they are taken to their study program or syllabus, which is organized by week and released according to the instructor’s schedule (for example, every Friday at 9 a.m. PT for the upcoming week). Within each week, students can check off completed work and view content organized by category, including Lectures, Readings, Assignments, and optional “Go Deeper” materials, allowing them to easily monitor their progress.
As part of the learning experience, students submit assignment links to a live, shared cohort board where they can showcase what they are building, learn from one another, and exchange insights. This board is automatically created for each cohort and is accessible only to enrolled students.
To make the experience more engaging, submitting an assignment triggers celebratory confetti, and students can react to peers’ work, post questions or key insights, and see who else is viewing the board in real time—features powered by Instant’s real-time presence and optimistic updates.
There’s also a Built-in AI Tutor (beta), which I built using OpenAI’s AgentKit. We’ve made the agent answer questions in Socratic Seminar style; it’s well-versed in AI Study Camp’s courses and has access to web search so it can help students with their questions.
Admin/Instructor Flow
The Admins/Instructors home page has all of AI Study Camp’s courses, as well as an action menu with key actions to take per course: Edit course details, manage curriculum, manage cohorts, and manage students. When I say ‘manage’, I mean full CRUD (create, read, update, delete).
Admins/Instructors can create new Cohorts tied to Courses, select the start date, enroll students, and manage the weekly syllabus release dates. The week’s content is not accessible to students until that date/time is reached.
Admins/Instructors call also see all Cohort and all Student stats. as well as track each student’s week-by-week progress with a heat map of completed curriculum by week. This allows them to check in with students regarding their progress and if they’re falling behind.
Admins/Instructors can Preview Cohort Views by going to Student View and selecting a specific Cohort. This allows Admins to troubleshoot and see exactly what’s visible to the students.
So, how did I build this?
Before I walk you through the build, it’s important to pause and clarify how we think of vibe coding as it’s wildly misunderstood.
For some, vibe coding connotes Lovable app building, YOLO-like thinking, and forgetting-about-the-code experiences. Here at AI Study Camp, we practice it more like ‘vibe engineers’, whereby we’re in the terminal, orchestrating Claude Code, and iterating feature by feature. We think of it and practice it as a craft.
Now, if you are an alumni of our Vibe Coding Foundations class, you also know we’ve hammered in this point: the quality of your ‘planning’ and product requirement documentation has an outsized impact on your experience building the app.
The better the plan and the clearer your CLAUDE.md file, the better you can orchestrate Claude Code and the less frustrating the build will be.
So as I set out to build this LMS, I used Claude Code to help me build my plan. Claude Code does not just execute code, it also helps you develop and think through the plan (a tip that many students are surprised by the first time they hear it!).
I also used the Superpowers ‘Brainstorm’ plug-in, which I find is better than Claude’s built in ‘plan’ feature as it asks more clarifying questions and can thus generate more detailed, comprehensive plans ahead of Claude’s execution.
Here’s an overview of the information I gave Claude (and using the brainstorm plugin) to then develop the CLAUDE.md and Detailedplan.md files.
- Vision: A lightweight LMS built specifically for AI Study Camp—just the features we need, none of the bloat.
- Tech stack requirements:
- Framework: Next.js (using React and Tailwind)
- Database: Instant (and use Instant MCP)
- Core requirements:
- Role-based access, permissions, and views (student and admin/instructor)
- Course content organized by Course, Cohorts, Weeks, and Lessons, with full CRUD capabilities (create, read, update, delete)
- Editable week syllabus release dates per cohort
- Student progress tracking, visible to the individual student and the instructor
- Live boards for each cohort for multi-user learning
- Beta AI Tutor, trained in our curriculum content and with reasoning capabilities
- Error handling, and safety gates
- Authentication flow using Instant’s magic link feature
User types:
- Student: Enrolled in one or more cohorts by an admin; can view courses, track progress, submit projects but cannot edit course data
- Admin/Instructor: full access to create courses, manage cohorts, enroll students
- Unassigned User: Someone who logs in but hasn't been enrolled in any cohort; sees an empty state with no course access
With the above information and back and forth planning and questions, I was able to generate the following files: CLAUDE.md and Detailedplan.md. To give you a taste of the content included in each file, I’ve provided screenshots below.
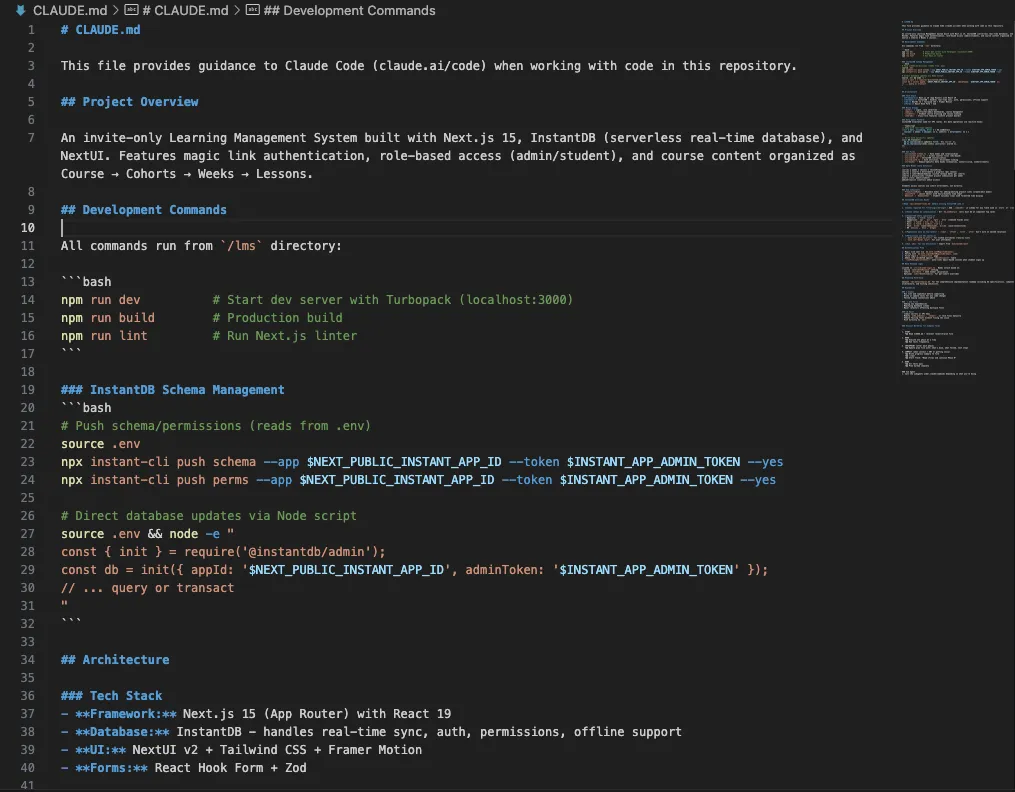
CLAUDE.md
This is the ‘instructions’ of the app for Claude Code to always keep in context. It includes what we’re building, what we’re building with, and key rules/reminders.
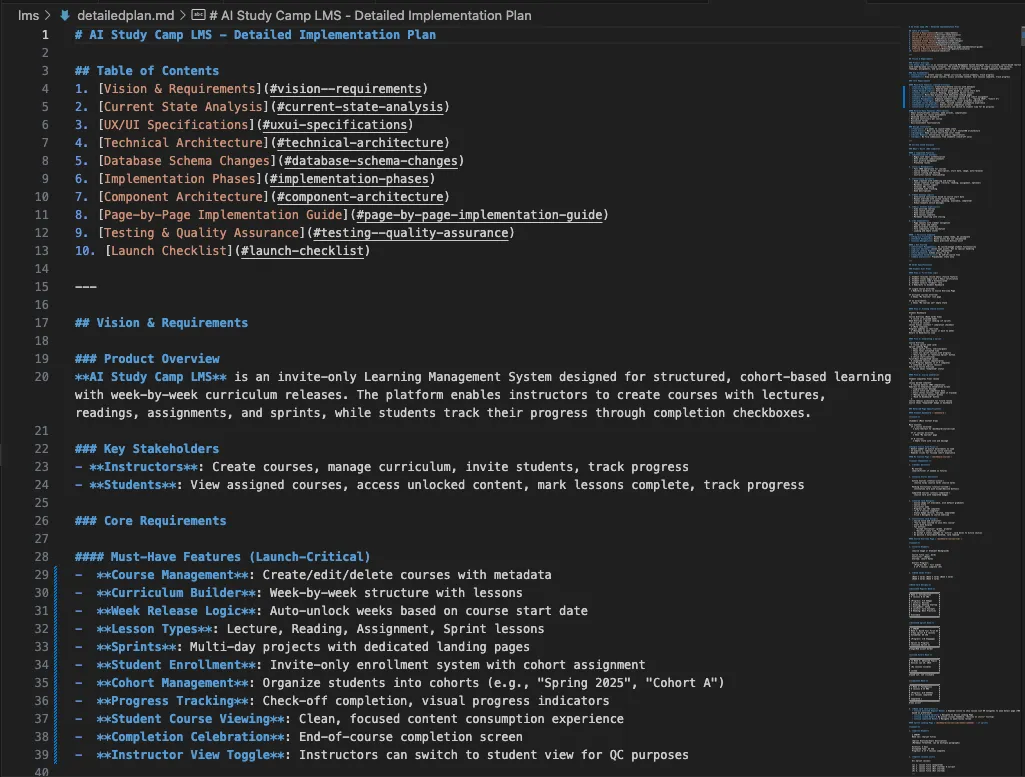
Detailedplan.md
This is the more comprehensive detailed plan with the various user flows, specifics on the design, implementation phases, and more. Take a look at the table of contents for an idea of the sections.
After refining the files and having an implementation plan ready for execution, I worked with Claude Code feature by feature and built out the different user flows. I was lucky that my starting of this project coincided with Anthropic’s release of Opus 4.5.
Now the building itself looks a lot like this: I tell Claude Code to start building a feature; we iterate on that feature back and forth (sometimes we update the original plan if we find a better direction); when I am satisfied with the design and test that it works, I commit the changes to GitHub; I test the deployment in Vercel to ensure everything works well and as intended; then I move on to the next core feature.
Sometimes things break as you add more features or test different use cases — that’s okay. Building is about testing, debugging, refining, iterating, and improving.
One area I spent significantly more time on was the LMS design.
For me, great design and a great user experience is the soul of a build. Coding Agents propose ‘okay’ designs without human guidance — you can think of it as ‘50th percentile’ good. So to add my own taste, I had a lot of back and forth conversations with Claude to improve the baseline design it originally proposed; things I changed included using Instant’s features (like live board & reactions to create more animated user experiences), leveraging HeroUI’s pre-built components, using a better font and icon library; adding a visual hierarchy and simpler user flows.
While most of the LMS was seamless to set up, there were still some structural areas to work through. My favorite one taught me something new about databases.
Solving the Enrollment Chicken-and-Egg Problem
I had an 'aha' database moment while building the LMS: solving permissions and data linking to achieve the student enrollment flow I needed.
The enrollment flow was simple in concept: an admin/instructor enrolls a student by email, and the first time that student logs in with that same email, they automatically see their assigned course. I thought the email would suffice as the ‘linking’ of the enrollment and the user record, but it turns out to be more complex than that.
Imagine you're a student trying to access your course for the first time:
- Your instructor adds your email to the course (creates an enrollment for "student@email.com"). This is saved in an ‘enrollments’ table that ties the email to the course and the cohort.
- But, you've never logged into the LMS before — you don't have an account yet.
- So, you sign up and create your account. This creates a record in the ‘$user’ table with your name and email.
- Now the system has a problem: there's an enrollment for "student@email.com" and there's a separate user table with your name, email, etc. — but these are two separate records that aren't connected yet.
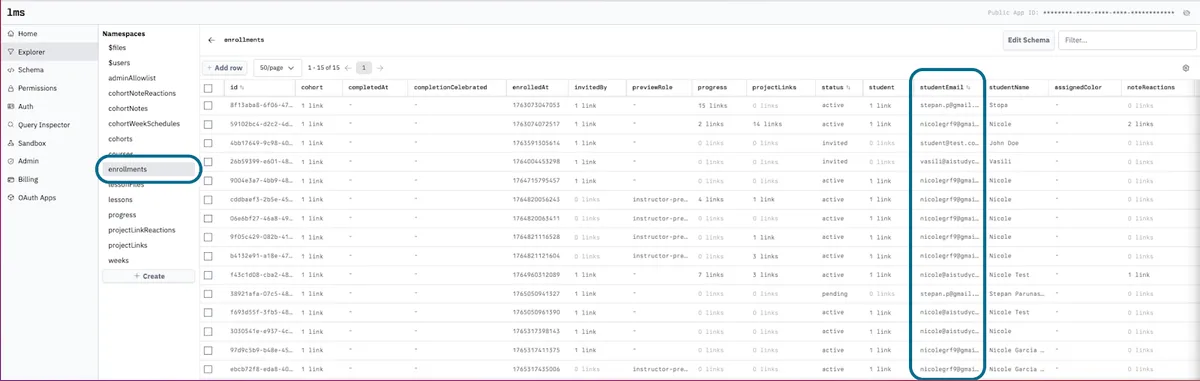
To give you a visual, here’s the record created in the ‘enrollment’’ table on Instant. You see there’s a column called “studentEmail”.
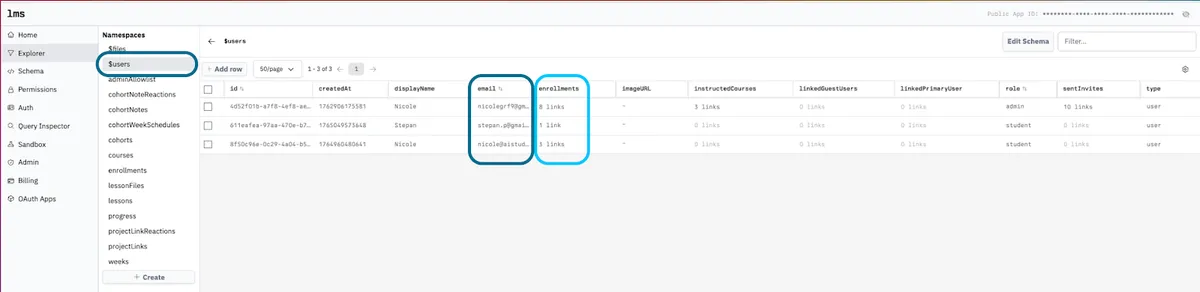
Then when a user signs in for the first time (with that same email), a record is created in the ‘$user’ table. Note the ‘link’ we need to create between the two tables lies within the $user table’s ‘enrollment’ column (light blue in image below), but this doesn’t just happen automatically when a user logs in — something has to trigger it.
So here's where it gets tricky: the LMS only shows you courses you're enrolled in. But to know you're enrolled, the system needs to match your account to an enrollment. And to match your account to an enrollment, the system needs to find that enrollment first — but it can't show you enrollments that aren't already linked to your account.
I quickly learned that this is a classic chicken-and-egg problem in database permissions.
The Solution: Server-Side Linking
The fix was to create a behind-the-scenes process that runs an API endpoint on the server with special admin access to the database — it can see all enrollments and make connections (i.e., links) across records. So when a new student logs in, it can:
- Bypasses permission restrictions using Instant’s Admin SDK credentials
- Searches ALL enrollments for any matching the student's email that aren't yet linked to a user account
- Links each matching enrollment to the student's account
- Activates the enrollment (changes status from pending to active)
Now when the student views their dashboard, the permission check finds the linked enrollment and shows them their course(s). While the above may sound complex for someone who doesn’t program or know too much about databases, it took Claude Code less than 30 minutes to plan and implement.
The abstract problem to takeaway: How do you let someone claim a record that was created for them before their account existed?
Any time you're building an invitation or pre-registration system — team invites, waitlists, pre-assigned resources — you'll hit this same pattern. The solution is a privileged server-side process that runs at first login to bridge the gap between "invited by identifier" and "authenticated user account”.
Conclusion
Building this LMS took two weeks, cost less than a typical SaaS subscription, and solved a real problem for our team. More importantly, it proved what we teach in Vibe Coding Foundations: with the right tools and a clear plan, you don't need to be a programmer to build software.
Special thanks to Stepan Parunashvili and Vasili Shynkarenka for reviewing drafts of this essay.