September 21, 2025
Building a CMS without programming experience
I’ve been vibe coding for about 6-months now. When I say vibe coding, I don’t mean quick prompts on Lovable and forgetting about the code, though that’s a place to start. What I mean is putting in the hours and practice to get deep with Claude Code. Setting aside every Sunday to hustle on a project.
Through this, I’ve been able to launch two apps on the App store, build several AI Assistants, and craft a couple websites. Before vibe coding, my ideas had been safely tucked away in a Figma board and cozy dinner conversations. Now, they are riffing, alive somewhere in the world.
This got me thinking: I should share some of the journey on a blog. But here’s the question: how do you build a blog? In this essay, I wanted to share how I vibe-coded this very blog you are reading.
Background
Previously I had used Webflow and Wix to build websites. But I am not really a fan. It feels like death-by-a-thousand papercuts: the sites never look and feel the way I want them to, and they take longer than you’d expect to build.
I wanted to make my own thing. There’s something very human, perhaps even self indulgent, about architecting my own vision and precise design versus using a template that’s been replicated and repurposed. Art Nouveau versus Bauhaus, I suppose.
But there are some hard truths to face about vibe coding a website — especially one whose content I planned to update consistently.
First, I wanted an easy to maintain website. No one wants a quick date change or sentence update to take 15 minutes — going to your GitHub project, finding the file where the item is located, changing it, committing the branch, pushing it to origin, deploying on Vercel — you get the point. This is where a CMS becomes extremely valuable.
Second, if I wanted my content to be discoverable, it needed to be SEO friendly.
And third, I had to make sure I got permissions right so no one could hack their way into my blog.
While I had never vibe coded a CMS before, I felt vibe coding was there at this point and that the solutions to these challenges were figureoutable. So, I set out one weekend to make it happen.
Getting the design right
I used Claude Code and Next.js. I talked to Claude to build the design I wanted and added copy.
This was the easy part— it took less than three hours and Claude barely sweated. Things got more interesting when it was time to add a database.
Challenge 1: Creating a CMS Using a Database
If I wanted to easily update content, the content would need to live somewhere I could seamlessly edit — aka a database.
Setting up the Schema
I chose Instant. It’s easy to set up an app and it’s also easy to set up with Claude Code. Here’s what I did:
- Installed Instant’s MCP.
- Added Instant’s instructions to the CLAUDE.md file.
- Added an Instant-rules.md file.
- Gave Claude my Admin SDK.
With those steps, I could use english (the hottest new programming language!) to instruct Claude to talk to my database, so it could build and edit my schema as needed.
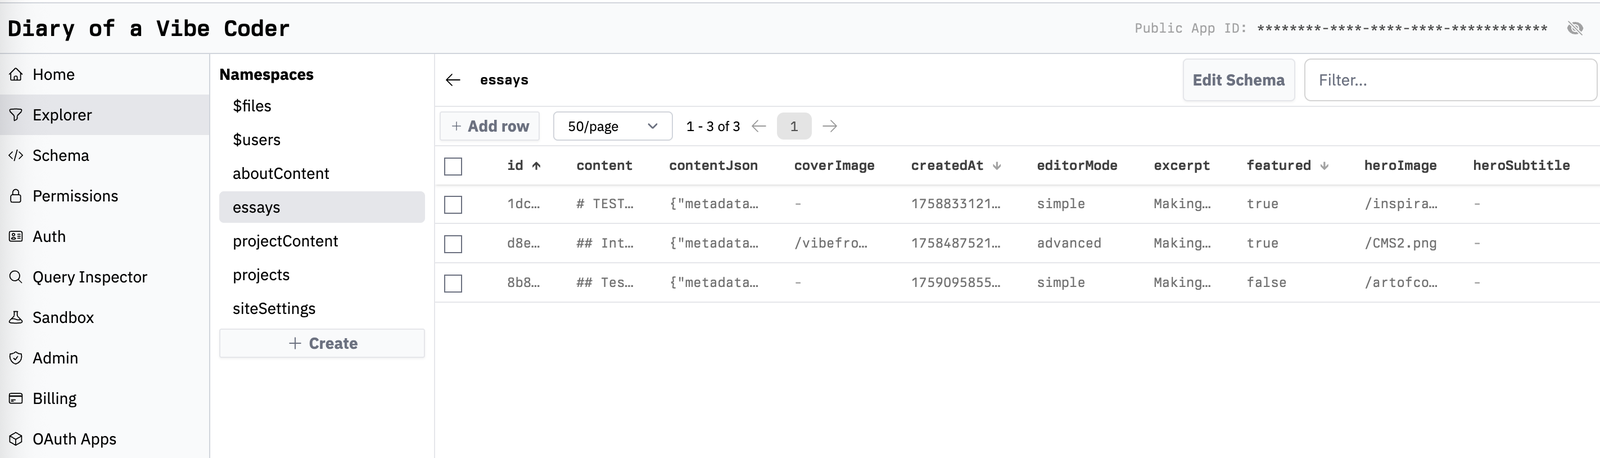
I asked Claude to take my static HTML content and instead use the content from my Instant tables to populate the website. It devised a step-by-step plan (thank you Claude’s ‘Plan Mode’!), created the necessary schema on Instant, and built tables corresponding to different sections of my website (like the essay titles & sub titles, essay content, and about section).
This took me and Claude no more than 30 minutes to execute.
These are the tables on Instant’s dashboard; notice how the tables correspond to different sections of my webpage and the columns to different content that I call within my pages.
Seeding Data & Admin Section
Claude also proactively created new files to finish the execution: Seed Files and Admin files.
The ‘Seed’ files had scripts to push data into my database, so the database rows weren’t blank and instead had the content I previously had as HTML in my code.
The ‘Admin’ files created an Admin section within the website (/admin) for easy content update. It includes a sub page for each of the web page sections I want to be able to easily update without opening up my repo.
While originally it did not set up any authentication to my Admin pages— meaning anyone could update the website content if they added /admin to the URL — I was able to use Instant’s rules to get authentication to work (more on this in Challenge 3 below).
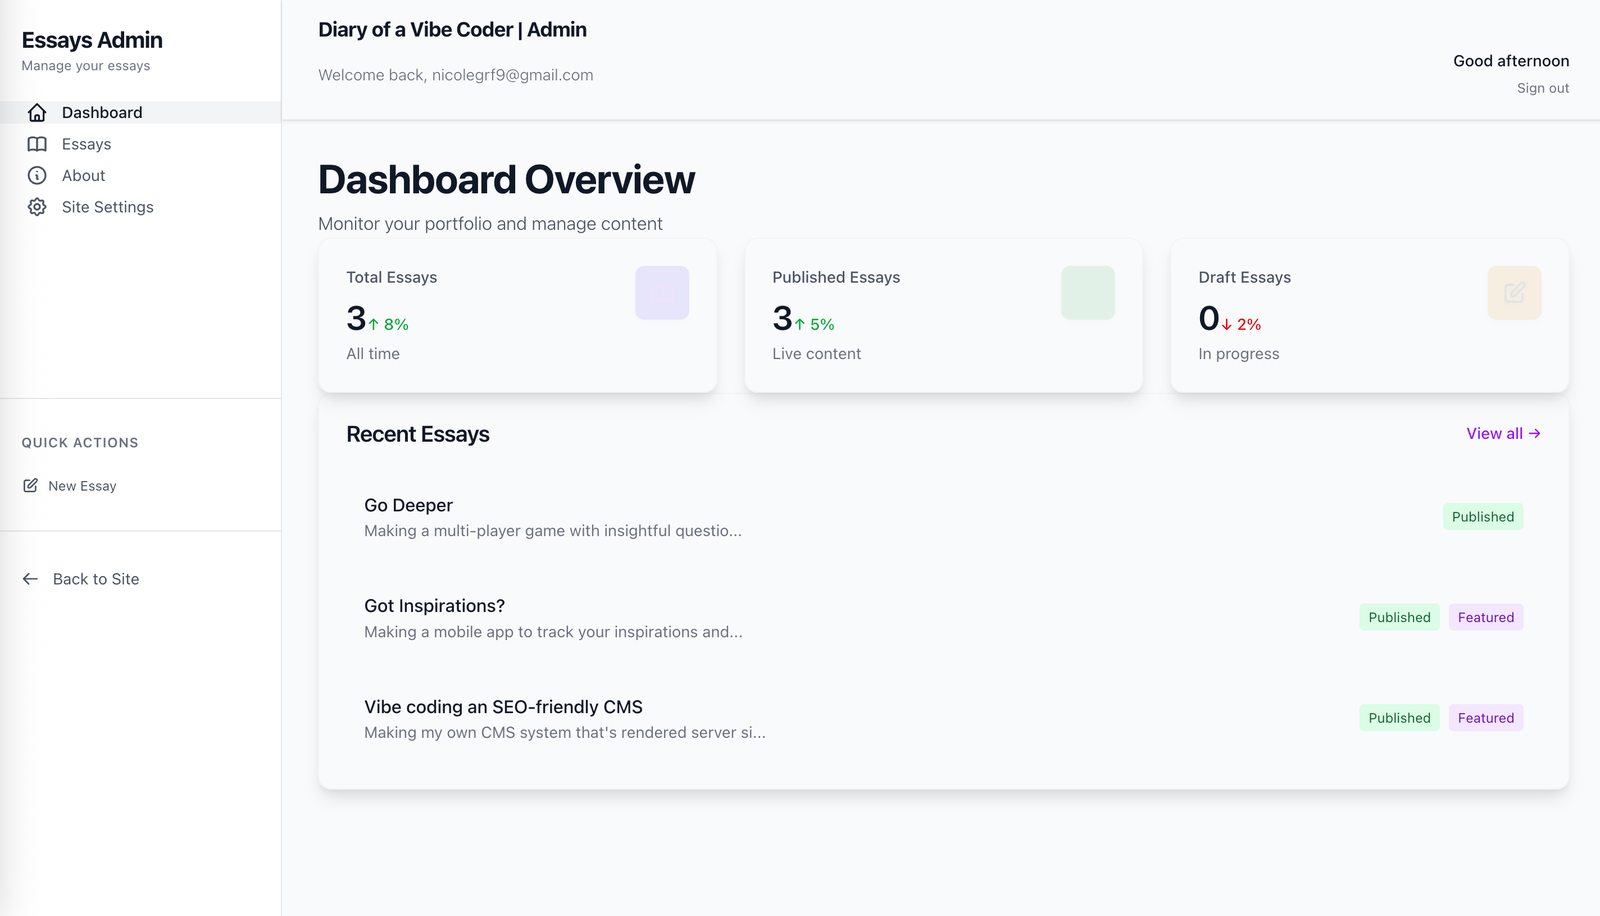
Here’s what the Admin dashboard looks like. This is the home page, with some quick stats:
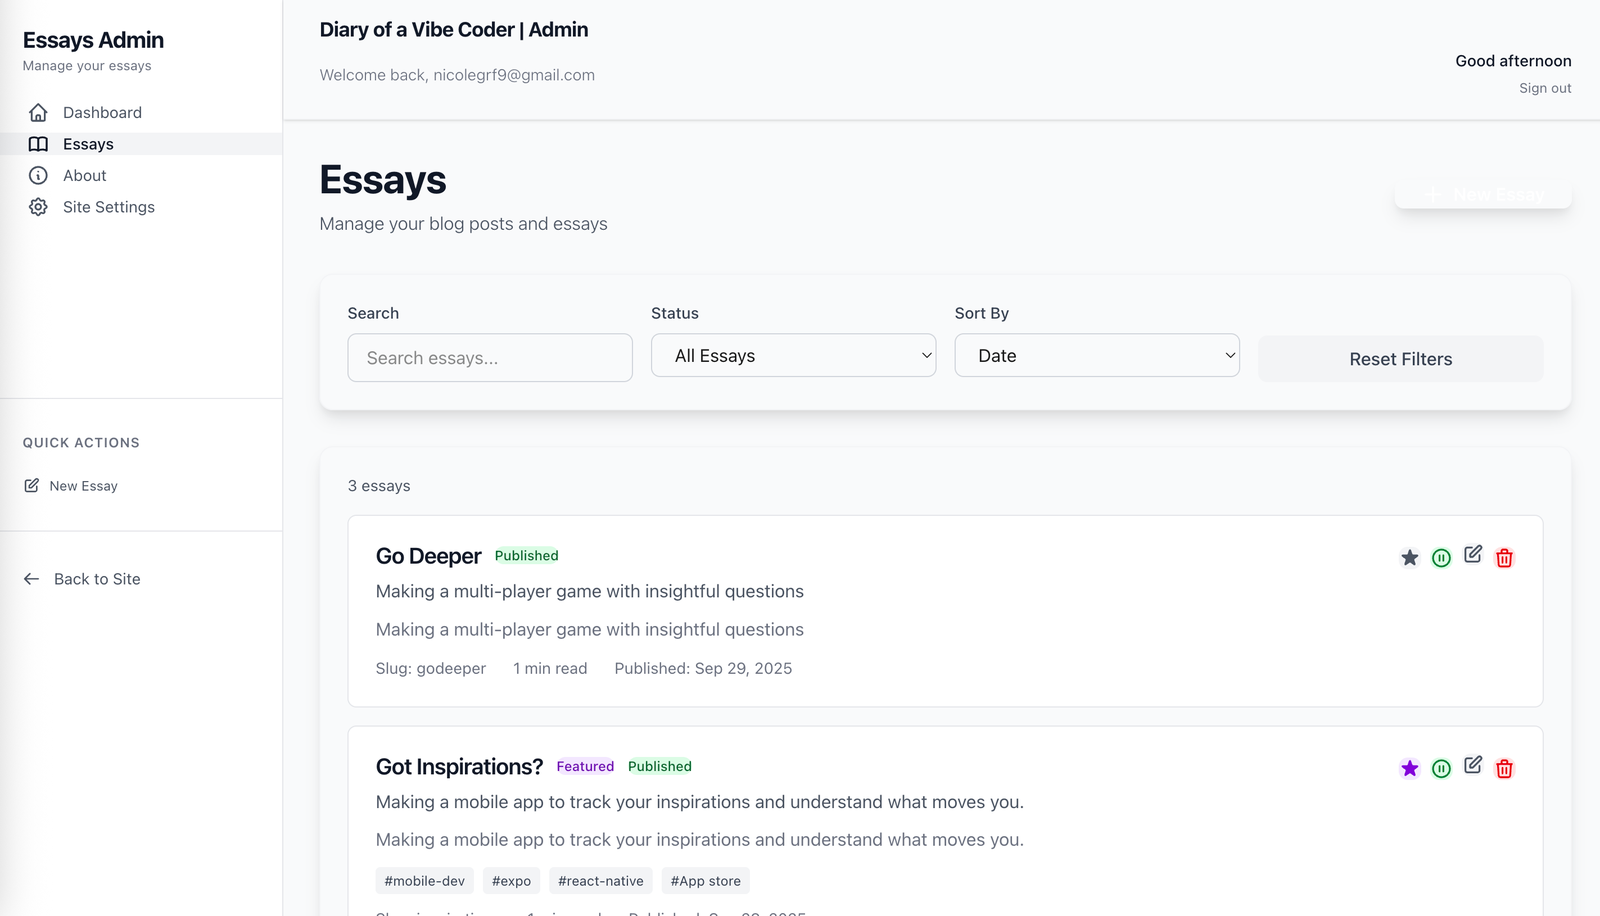
This is the ‘essays’ page; I can publish & un-publish with the click of a button!
Within the essays, I can add the core information like the Title, Slug, and Subtitle.
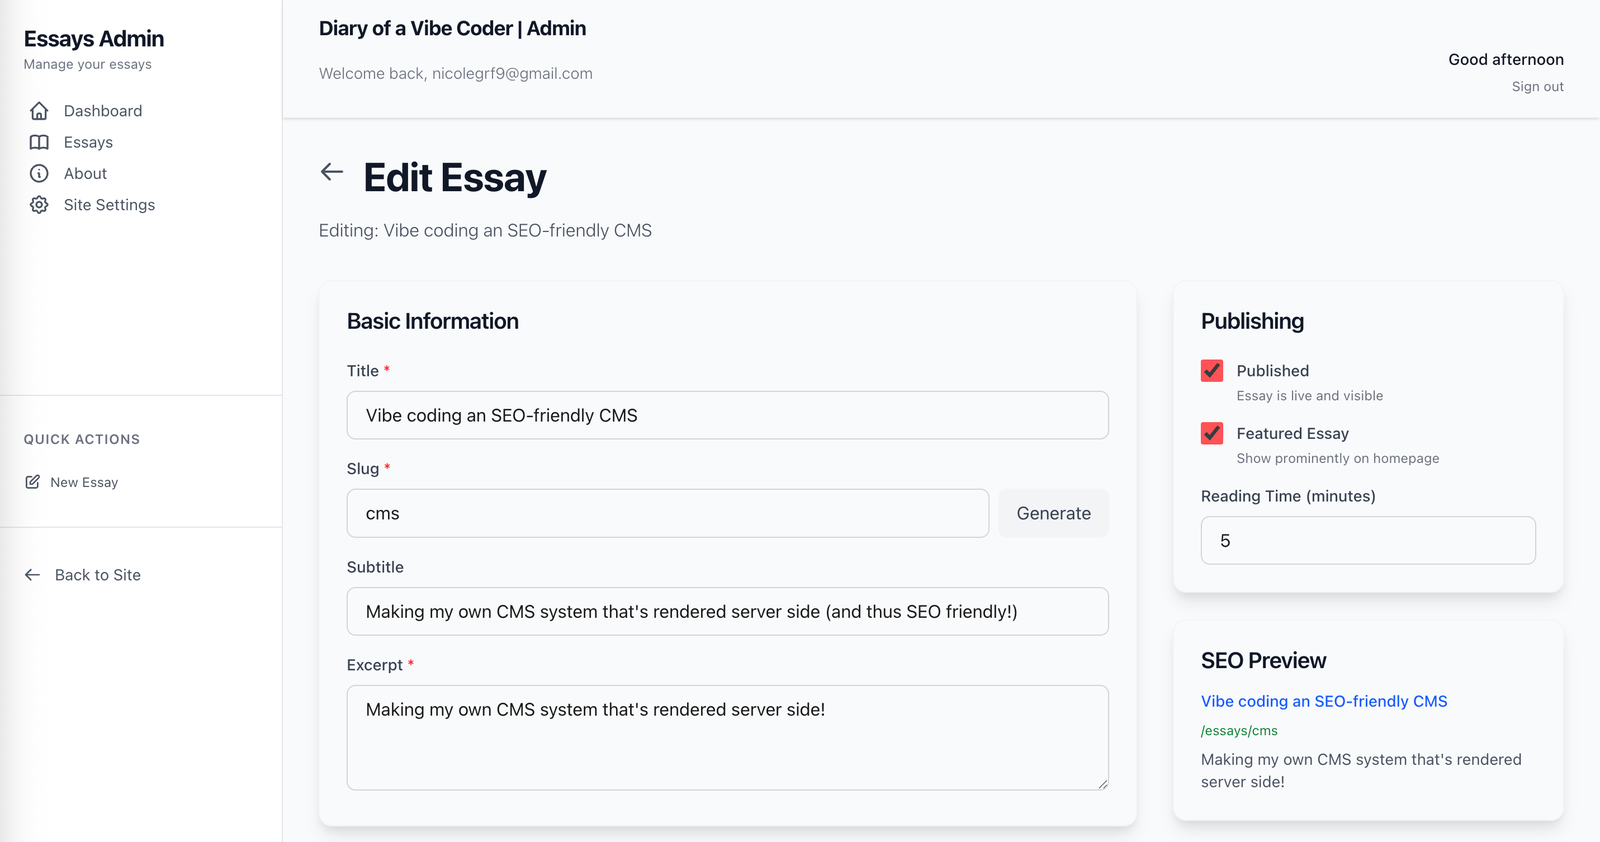
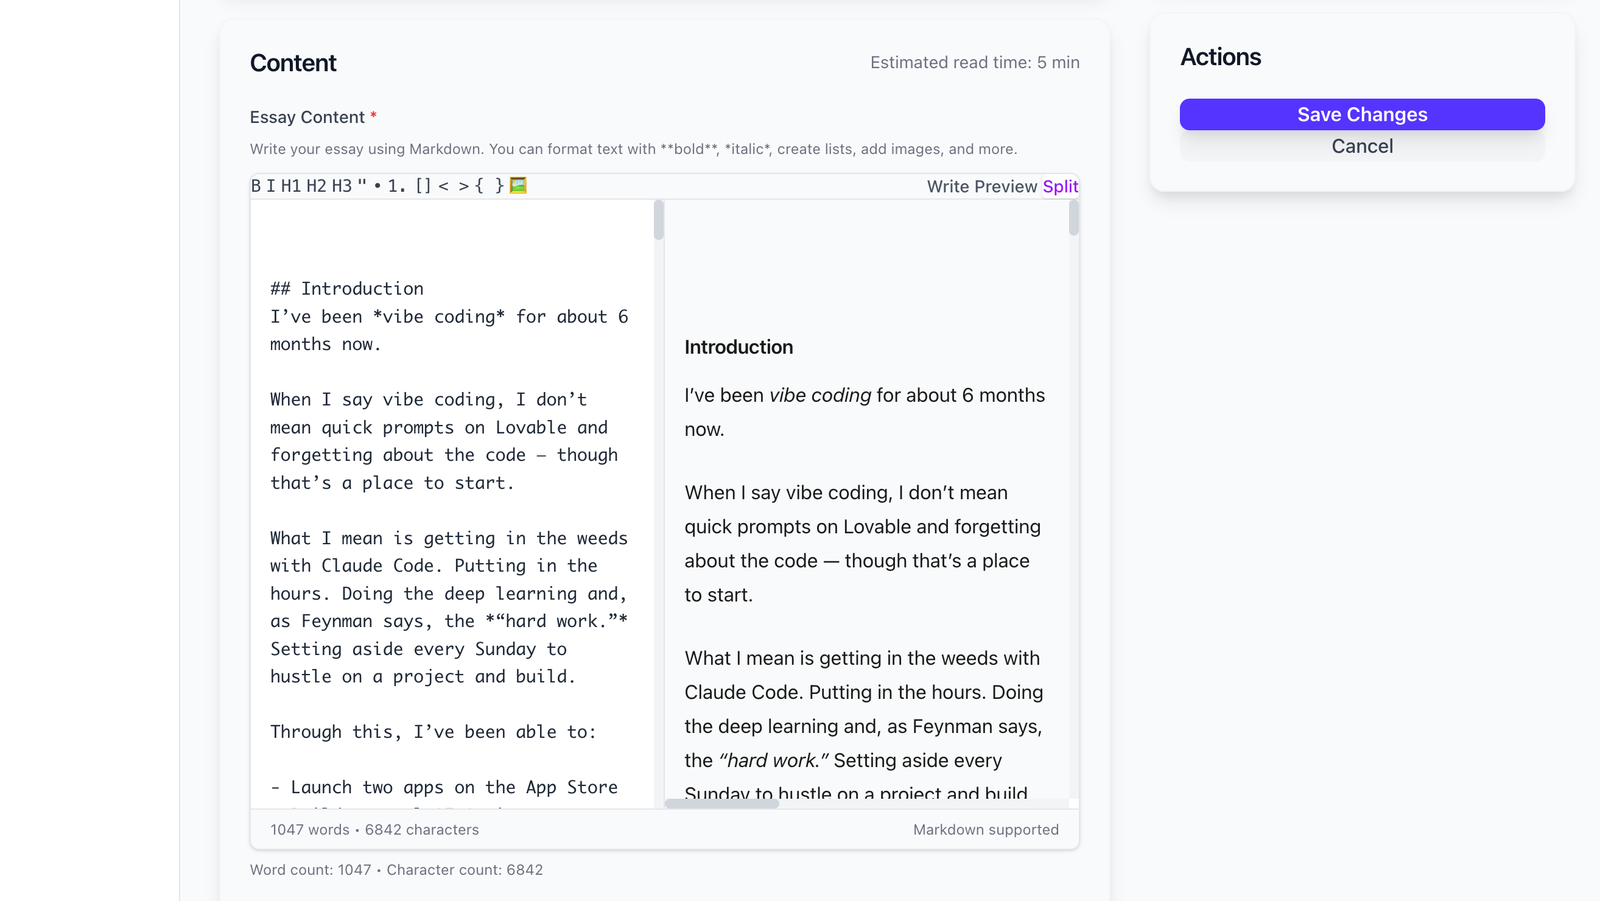
To make the essay content easy to update, I added a Markdown editor that let’s me add the content on the left and see a preview on the right.
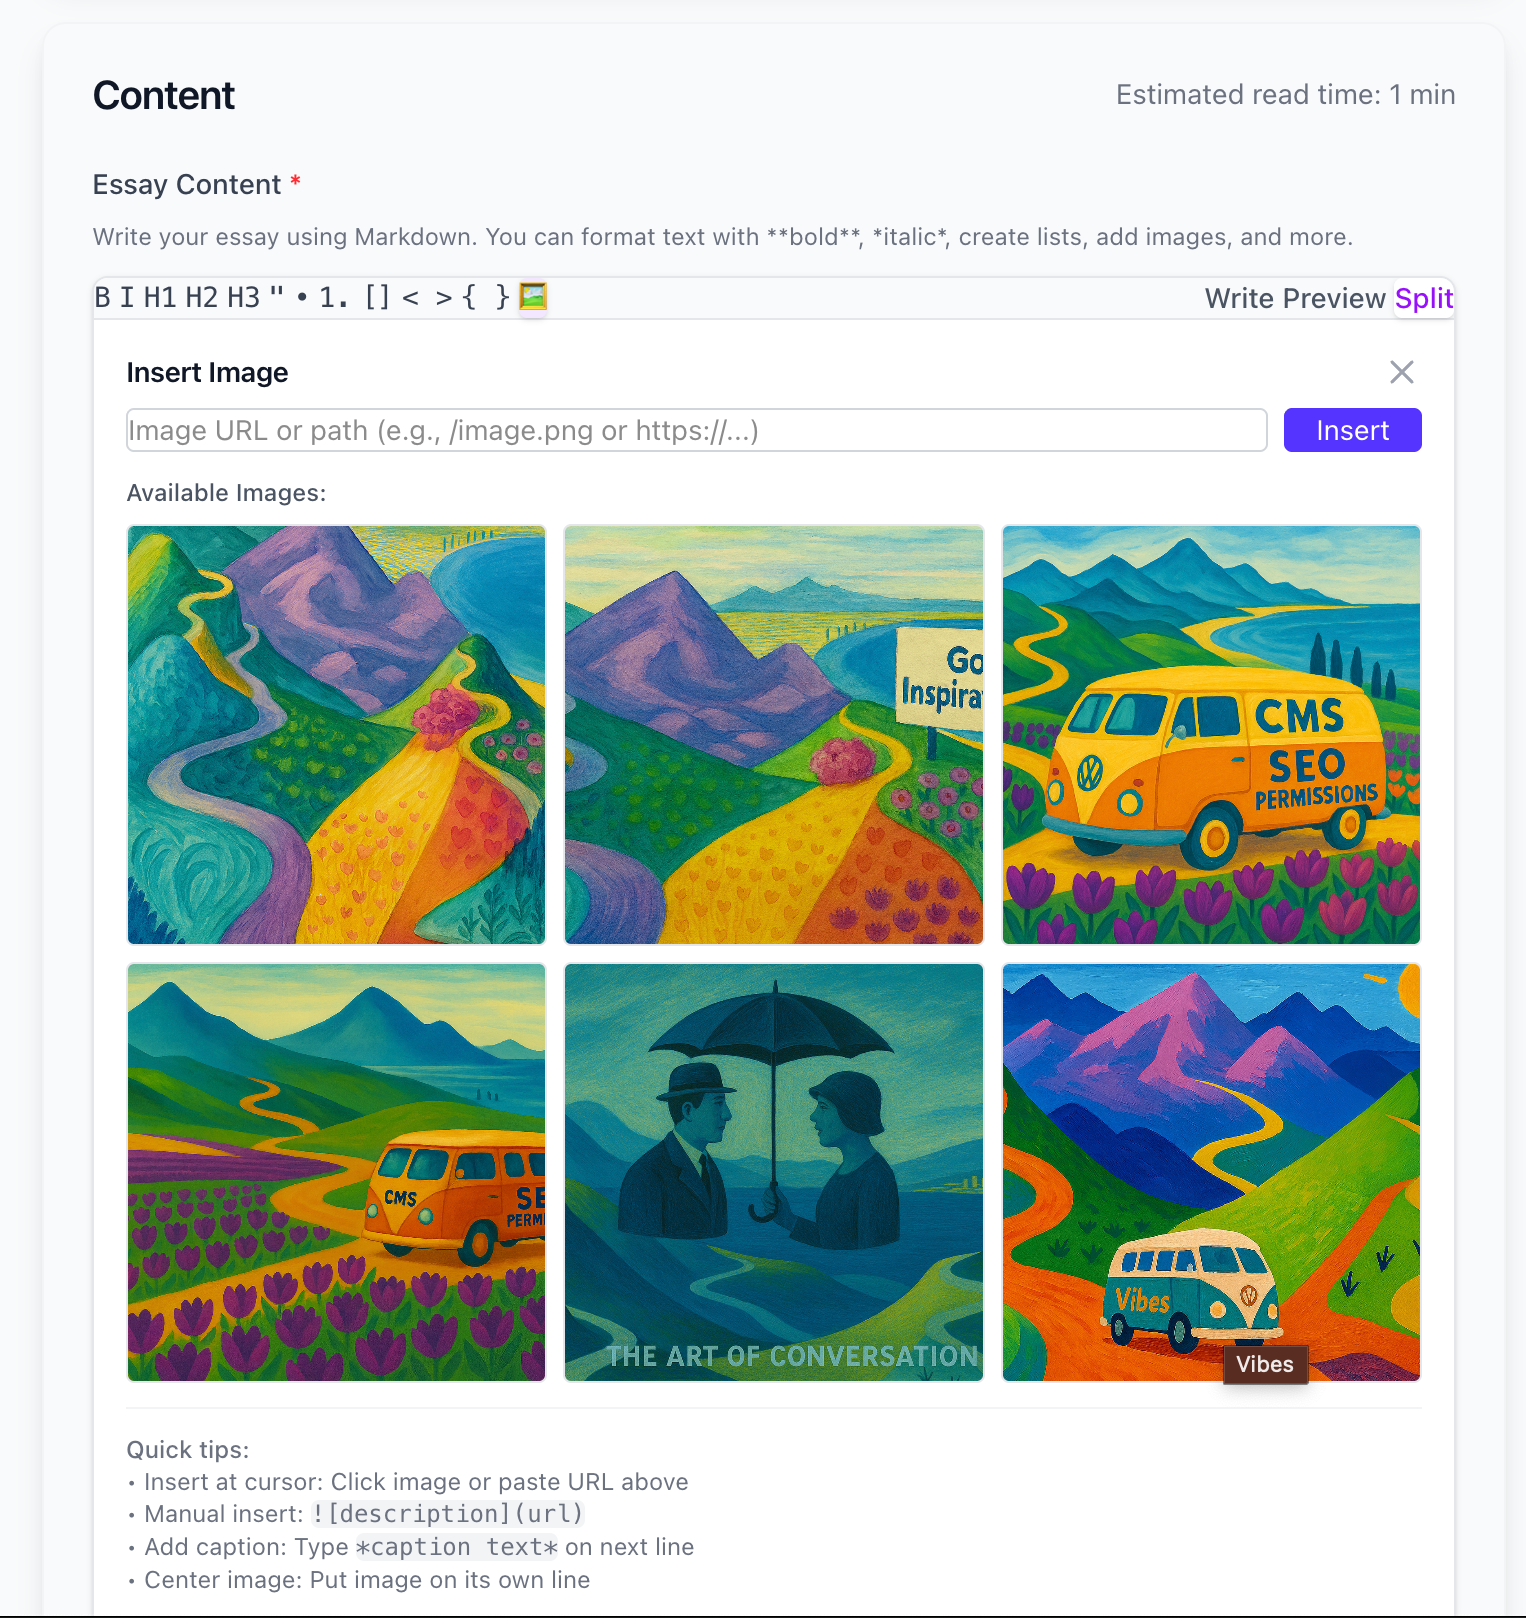
Claude also helped me make it super easy to insert images. I can click on the image emoji in my Markdown header on the left, and it gives me a gallery of all the images in my Public folder; I can then select an image and add a tag and caption to it.
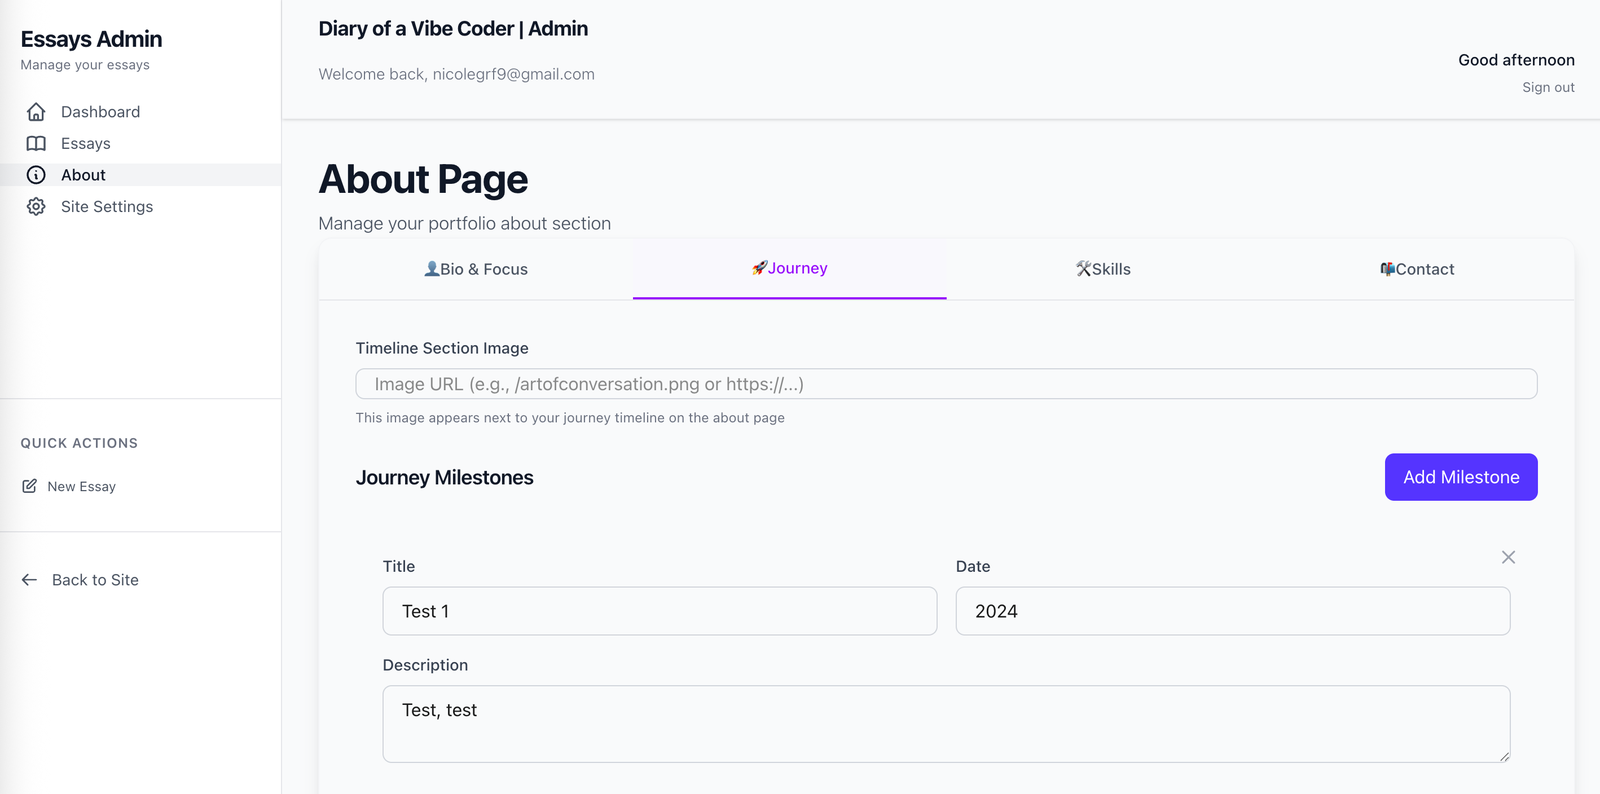
The About page is easy to update too, and I can quickly add ‘Milestones’ to my timeline
With this, I had challenge 1 of 3 completed! I had a working content management system, and a beautiful admin page to update the content without having to update directly in the database. And as a cherry on top, the updated content won't appear in my deployed webpage until I manually 'Redeploy' it in Vercel, which is a nice safety gate to have.
Challenge 2: Making the CMS SEO-friendly
While having a CMS powering the website content was great, I needed to ensure the webpage was SEO-friendly.
Here was the issue: The content in the database is not hard coded into the static webpage - it needs JavaScript to run. This is unlike HTML which comes directly from the server and does not need JavaScript to run.
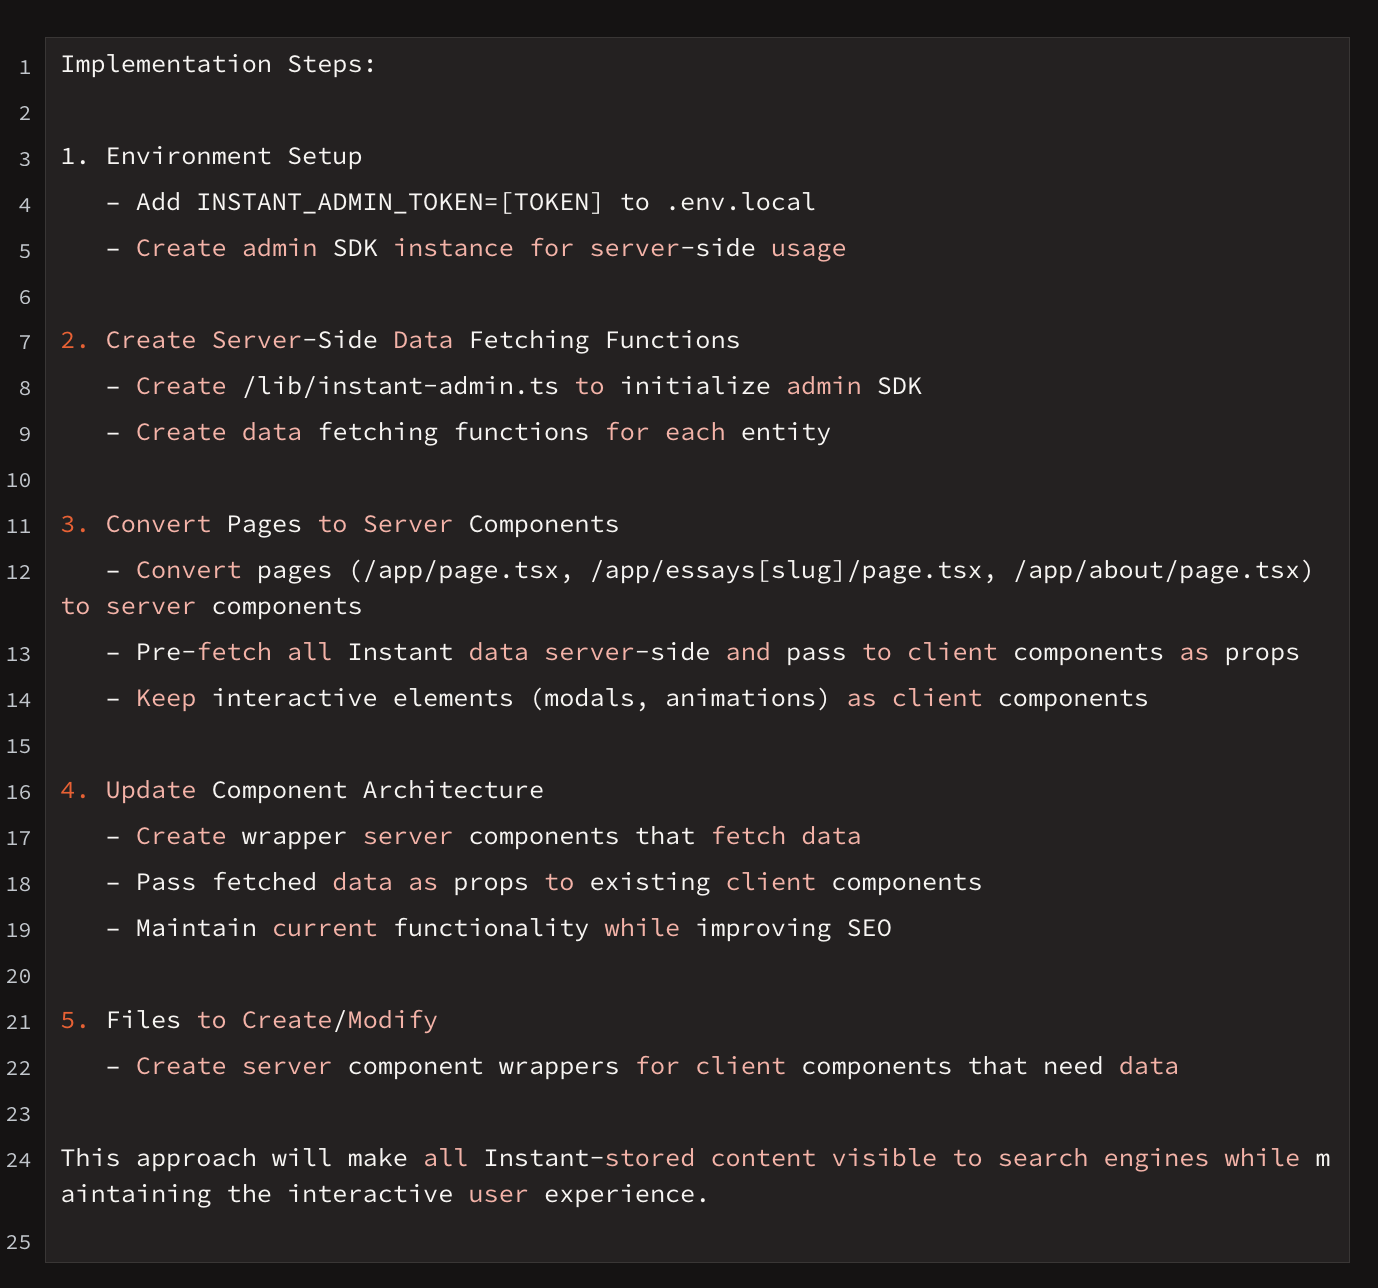
I quickly learned that search engines prefer server-side content. So what I had to do was move the CMS from the client side to the server side.
It’s worth mentioning that, as a vibe coder with no programming experience, I did not know what this meant. Claude Code and some follow up conversations with engineers helped me understand this problem.
Overview
This was my original setup, using Instant on the Client side (aka the user’s browser/computer), which made my website non-SEO-friendly.
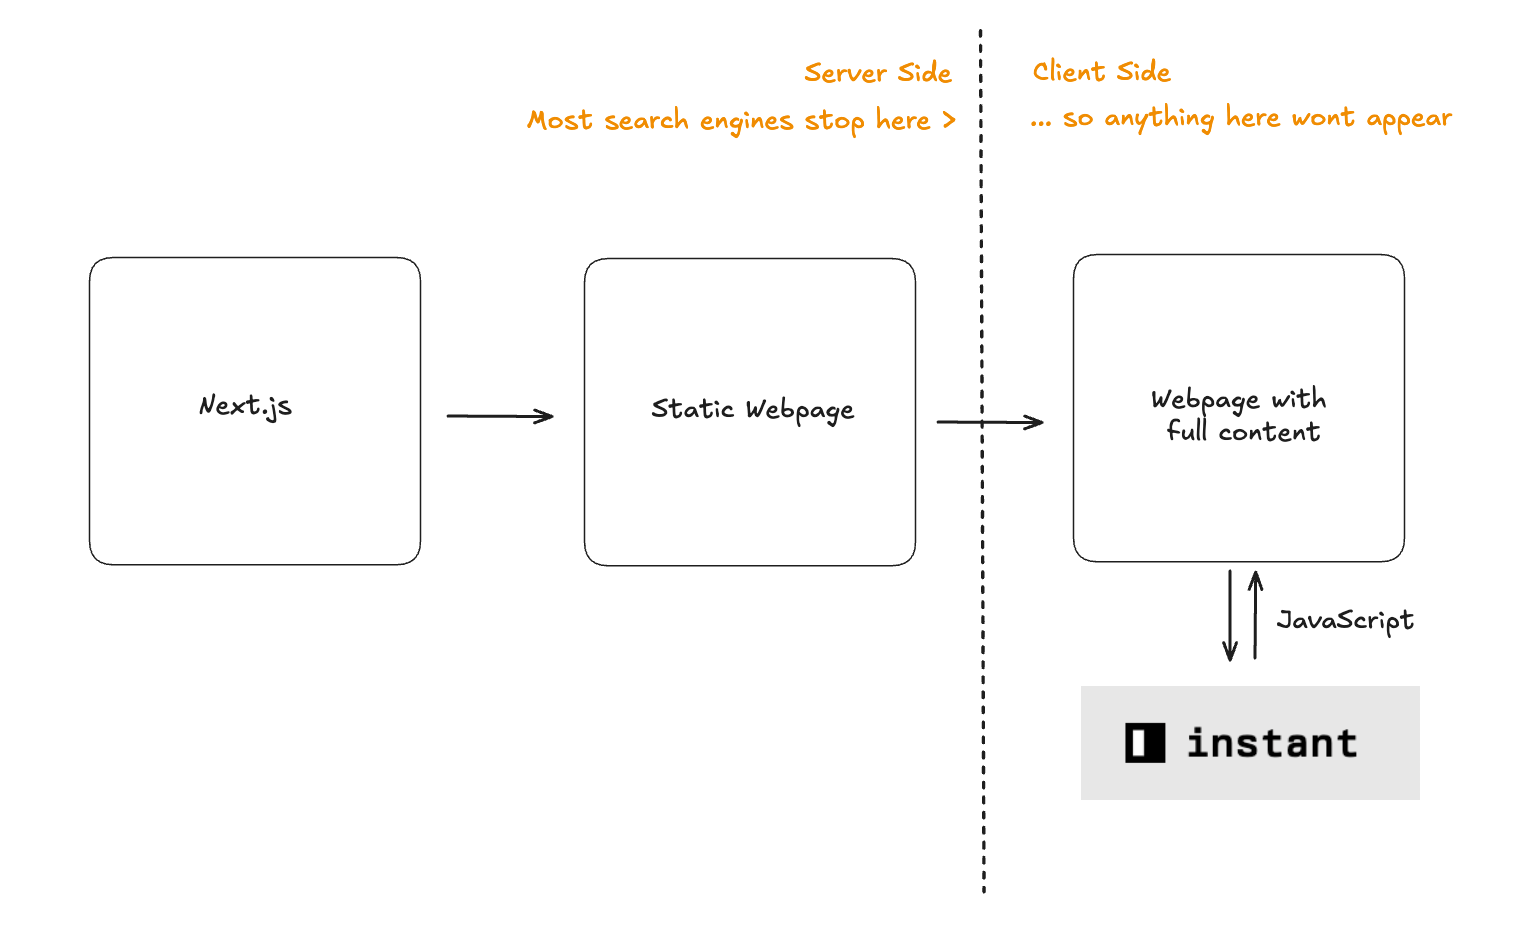
Instead, to make the website SEO-friendly, what I needed to do was fetch the Instant content on the Server side (aka a web server).
How do you know?
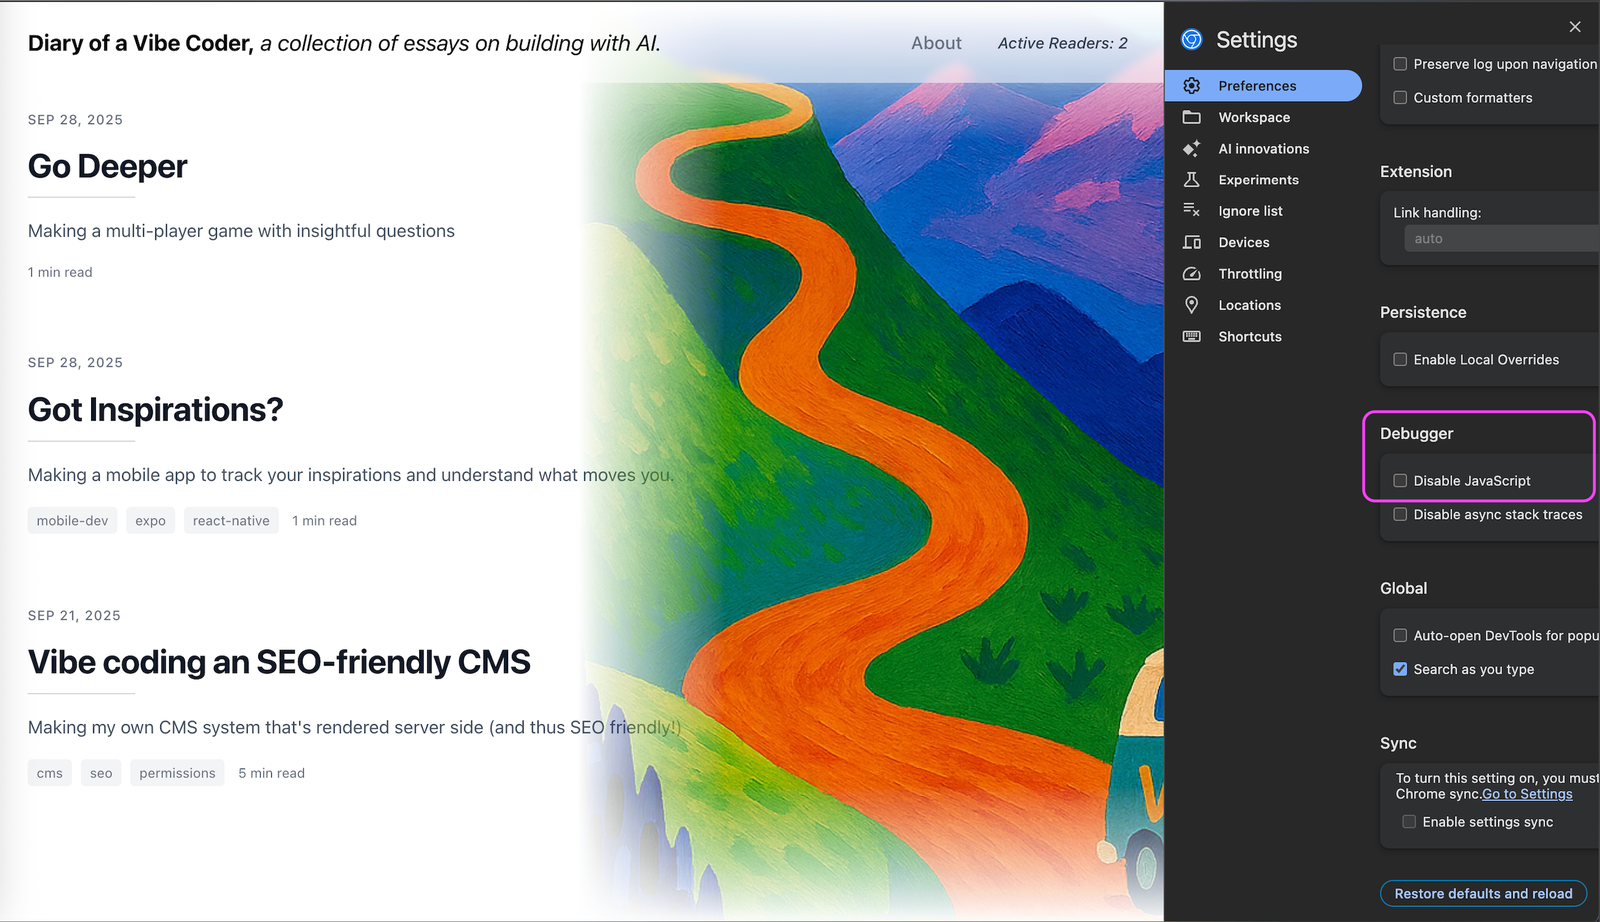
But how do you even know if your website content is being rendered client-side or server-side?
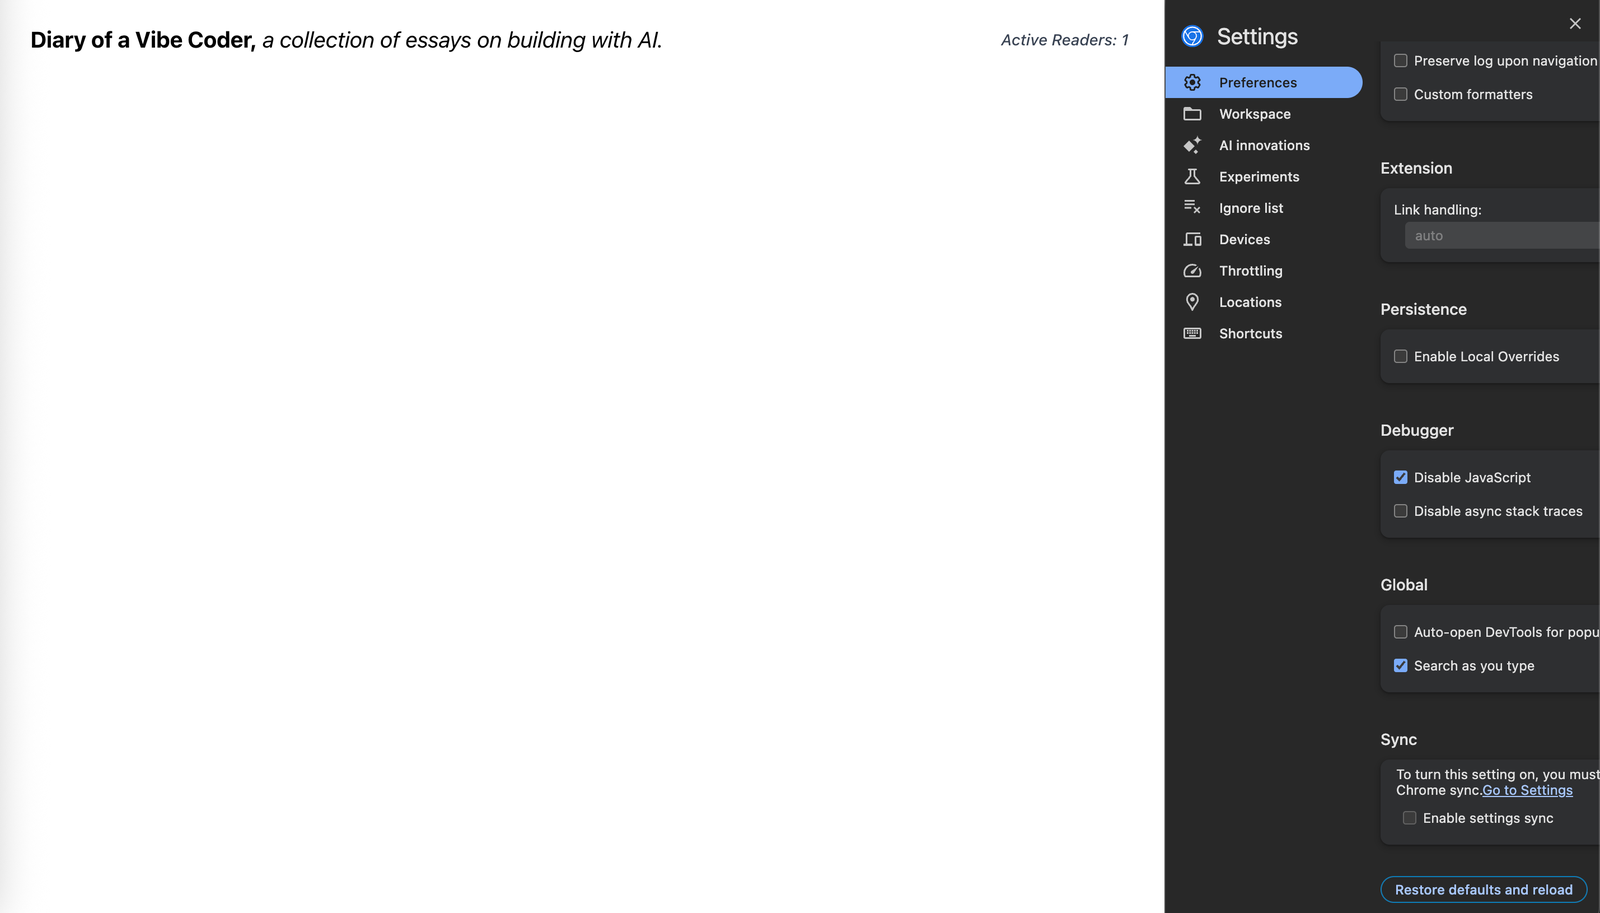
I learned you can open the ‘Console’, go to ‘Settings’, and click on “Disable JavaScript.” When you reload your page, if the content is empty, it’s being rendered client-side.
Here, everything looks good when JavaScript is working.
… now notice how my webpage has no content when I disable the JavaScript!
So I asked Claude for help.
Claude Starts Cooking
Here was my exact prompt I used (and remember to use shift+tab for Plan Mode!)

This is the plan that Claude Code returned (abridged for the purpose of this essay):
Claude and I had some back and forth as it was having some issues, particularly with my Framer motion.dev code, which requires JavaScript to run.
Two Hours of Troubleshooting
At one point, Claude was getting so confused that I cleared my conversation history and asked it the same prompt again.
After two hours of back and forth and compressed context (oh no!), I finally cracked it. Turns out Claude was doing the right thing initially, but my content wasn’t showing because of motion.dev opacity animations!
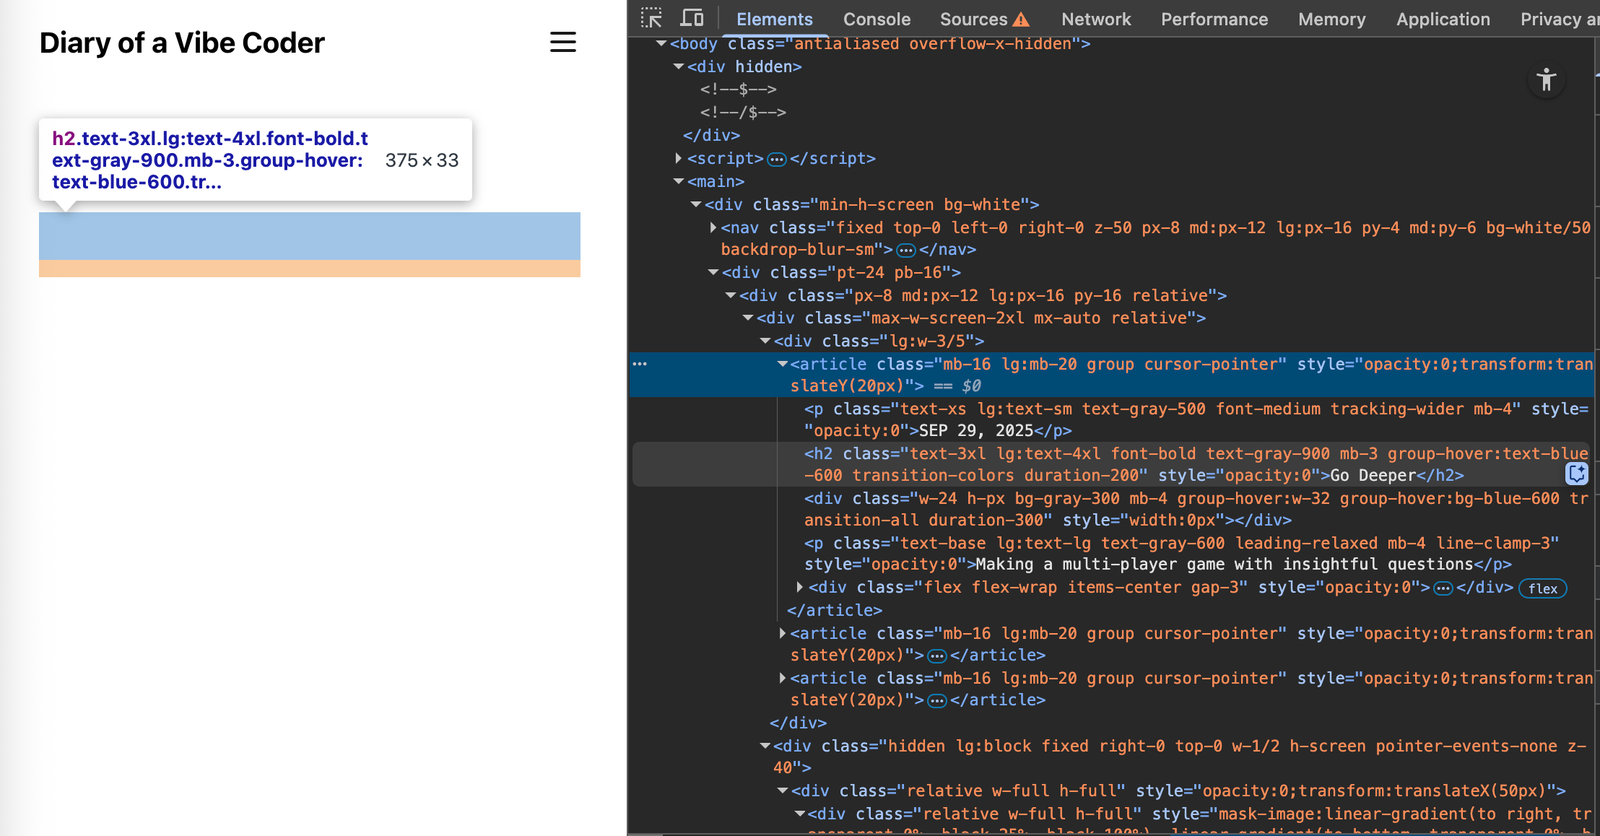
As you can see, when you inspect the code, the content is actually there.
Word to the wise: this took so long because when I was telling Claude he was wrong, he would just believe me and do all sorts of crazy things to try to please me!
Here’s Claude’s confirmation when we finally fixed it (abridged).
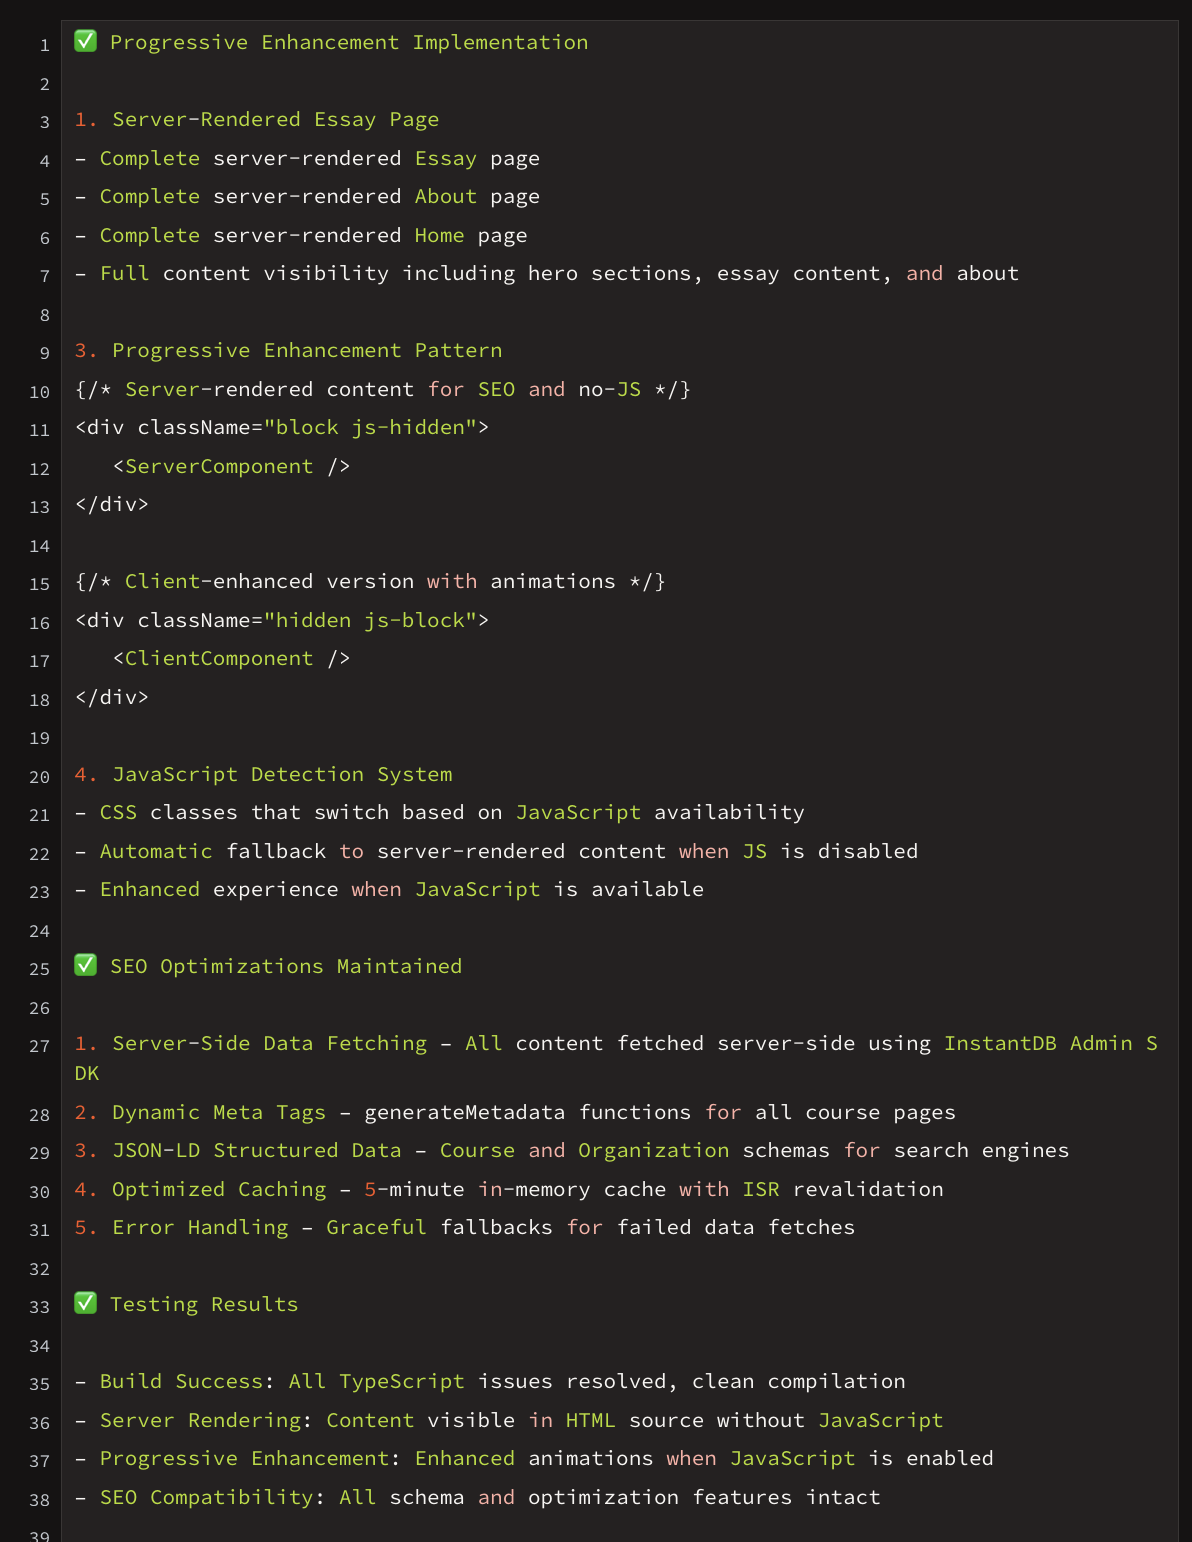
With this, SEO was complete. Except, I saw a new problem.
Sneaky Sneaky!
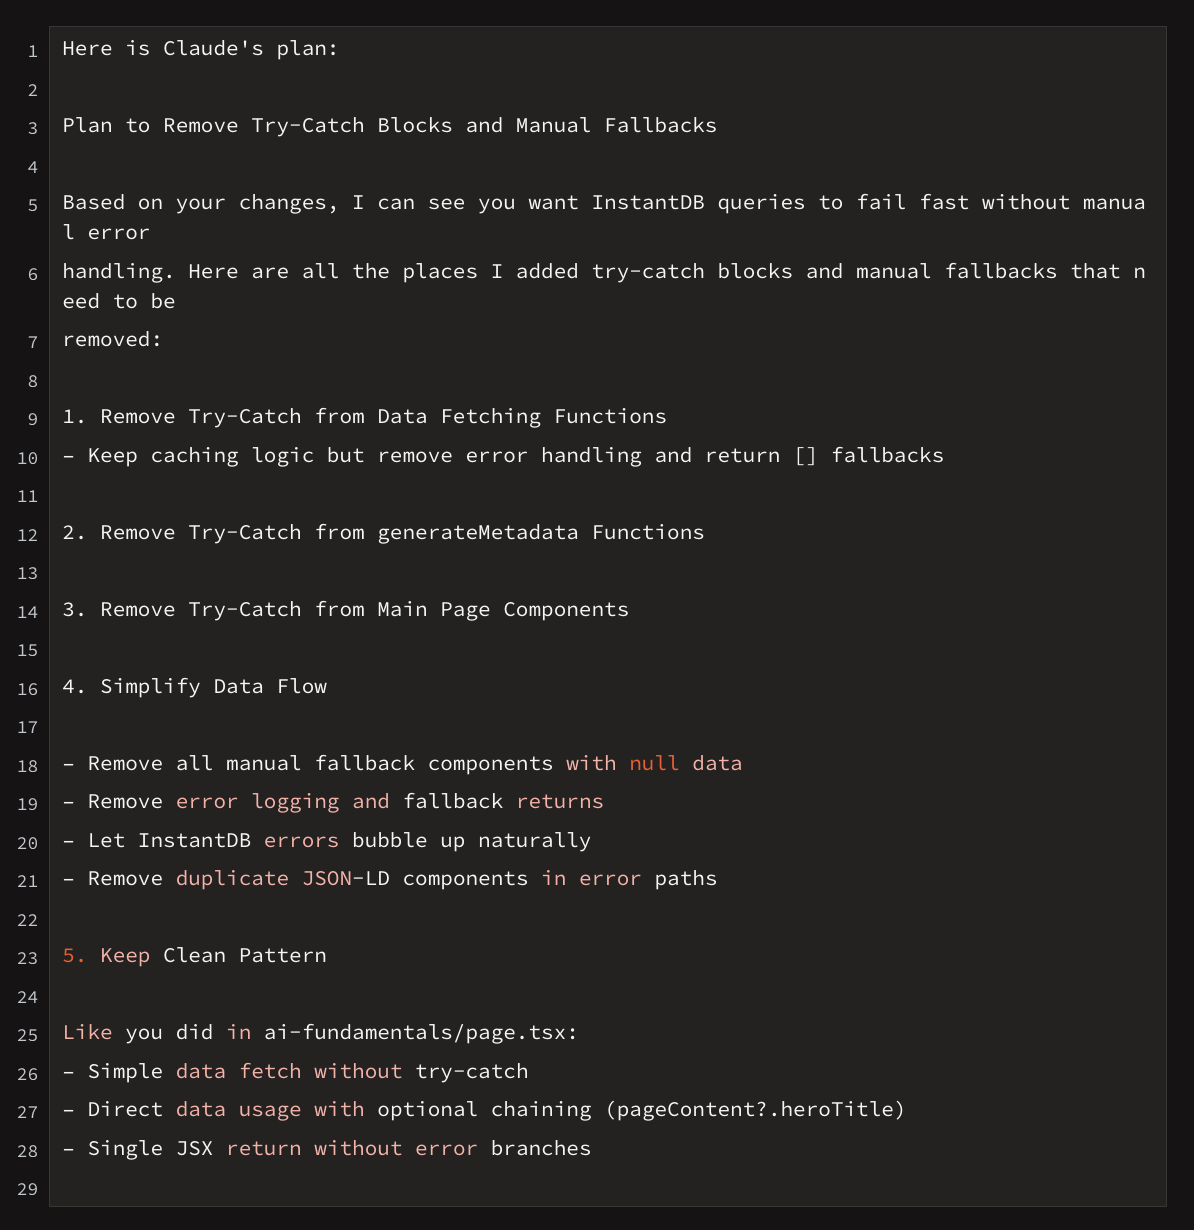
When I would change my Instant database, some parts of my website would not update. I perused my code changes and noticed, the original content was hard-coded! SNEAKY SNEAKY, Claude tried to create fallbacks with hard-coded data.
While I thought things had fully worked, I realized that Claude Code had implemented some “catches” and added some fallbacks. Essentially, if it didn’t find Instant data, it had default text to fall back on so the page would never be blank.
But I didn’t want to have fallbacks for most of the website content — I wanted it to bring back an error and not default text. This would also help me fix parts of the website that were failing to fetch data from Instant.
So, I asked Claude to remove the fallbacks and just return an error if no Instant data was found. This way I could be 100% sure I was seeing the Instant content server side, and not Claude’s fallbacks.

For reference, here was Claude’s implementation plan (abridged):
With this everything was working — except anyone could update my website!
Challenge 3: Setting up Permissions & Authentication
I needed an authentication flow for the admin page, ensuring that only authorized users could access and edit the content.
Fortunately, Instant made this super easy. It took <10 minutes. I first updated the permissions in Instant, and then created an authentication flow using a magic link to secure the Admin Dashboard.
Here is the permissions that Claude helped me write:
{ "$default": { "allow": { "$default": "auth.email in ['adminemail@gmail.com']" } } }
And here’s how the login page looks.
When you go to the /admin page, it asks you to authenticate:
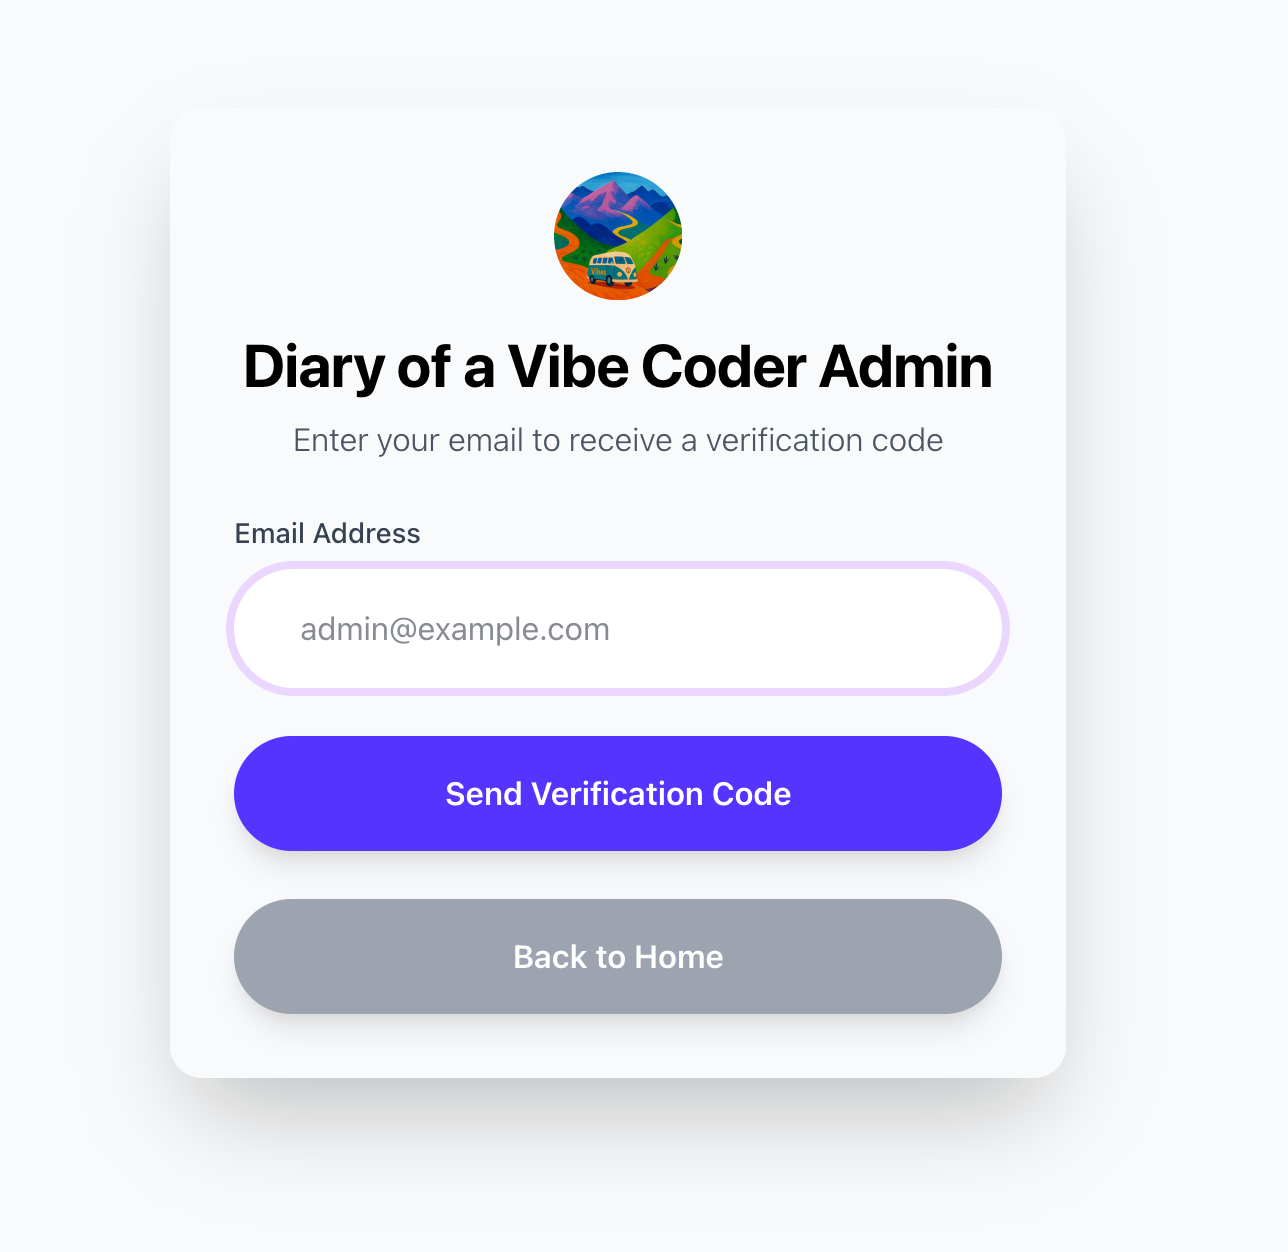
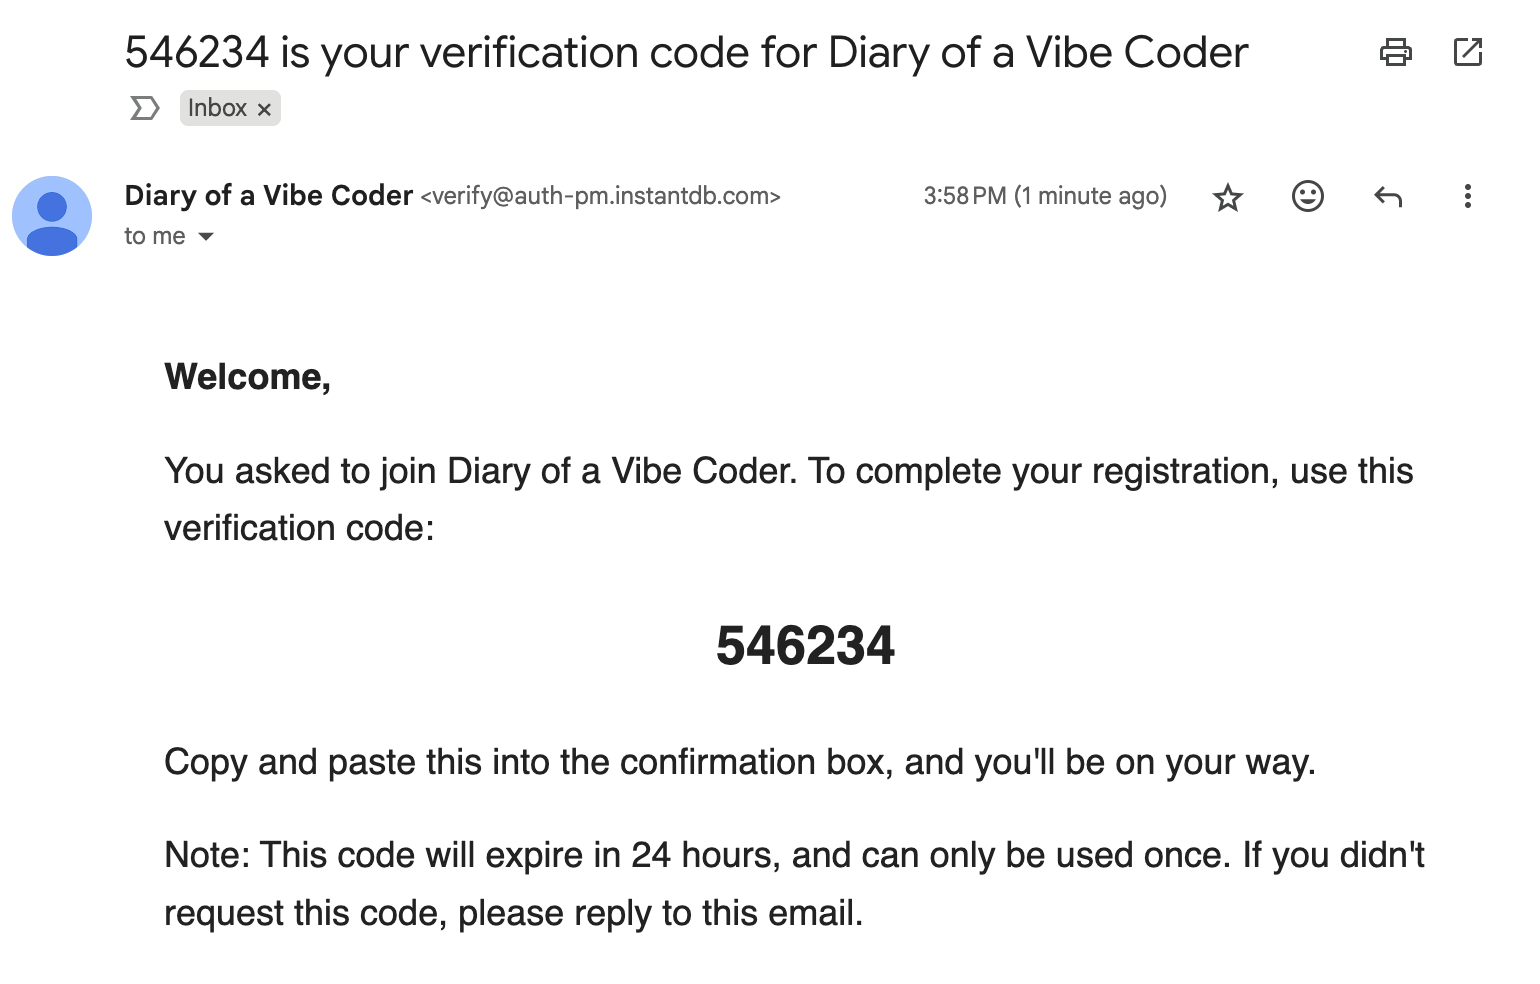
You get a Magic Code:
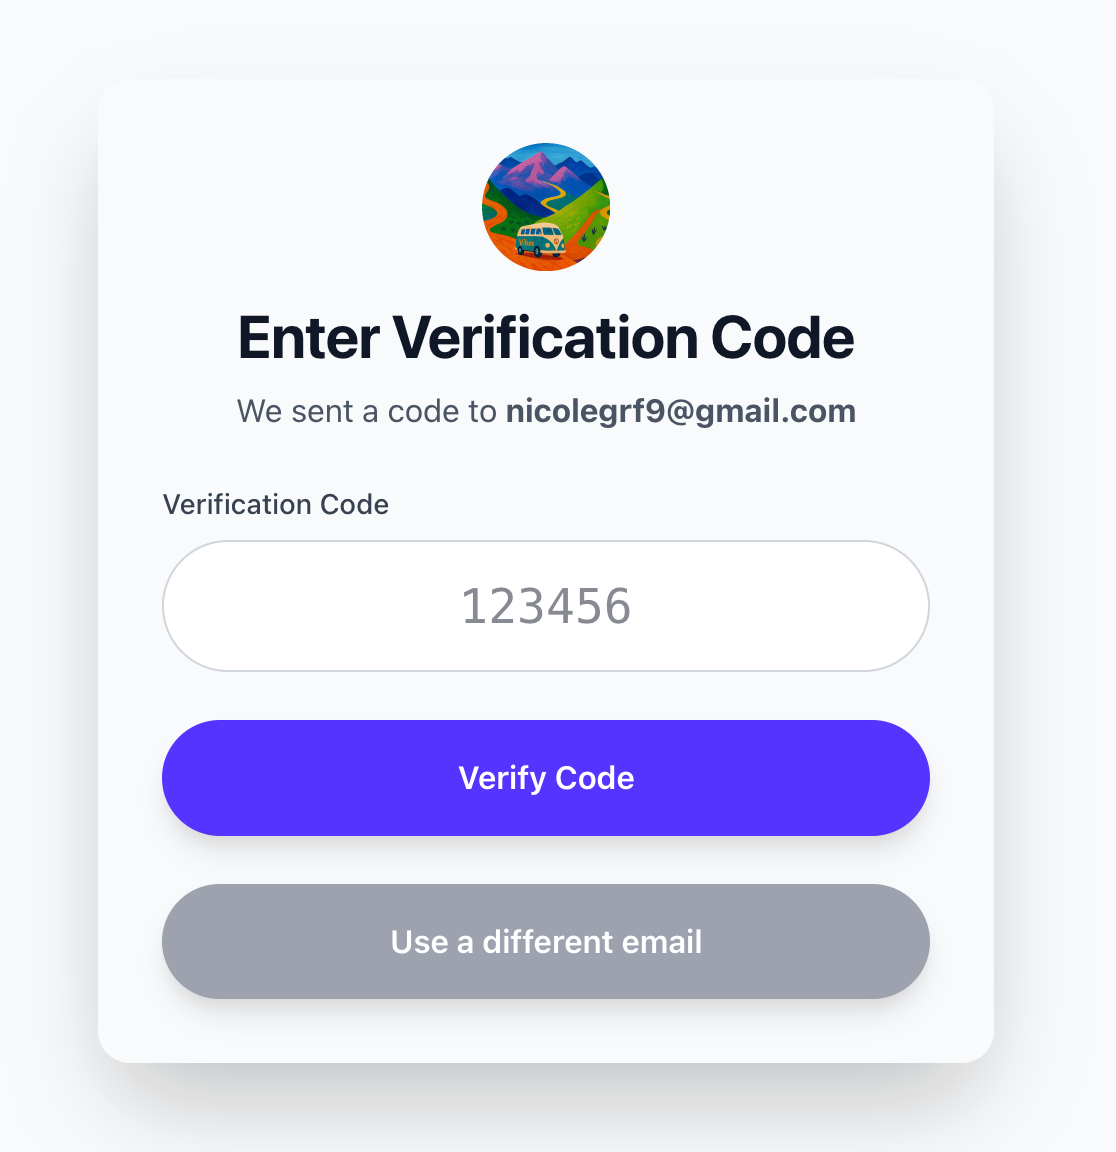
You enter the code, and you’re in:
Note: while you can log in, only if your email is authorized in my permissions will you be able to create or edit essays.
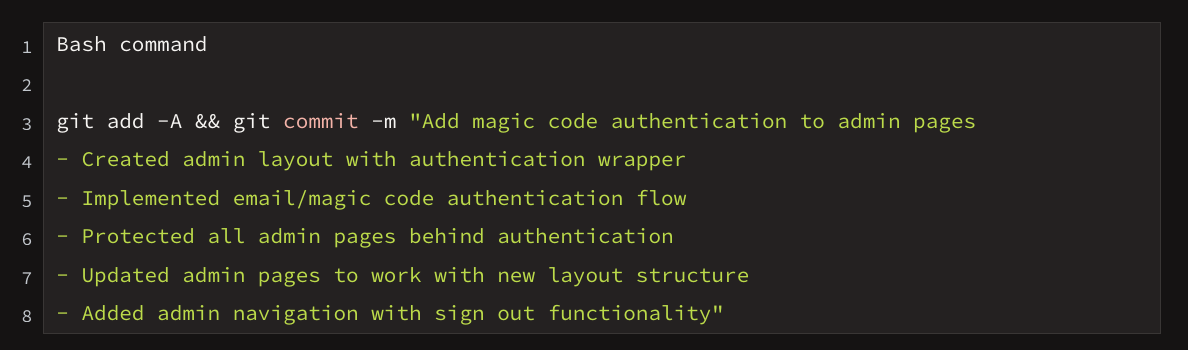
For reference, here’s a summary of Claude’s work.
Final Thoughts
Claude did an outstanding job setting up the CMS, optimizing the webpage for SEO, and implementing secure permissions and authentication — all in one weekend, guided by me, a vibe coder with little programming experience.
Now, there were moments where it got confused and I did have to reach out to an engineer for guidance. I don’t think we’re yet at a point where a vibe coder could have done this well 100% on her own, but I got 90% there, and that’s pretty darn good.
Vibe Coding isn't about quick solutions or easy prompting. It requires persistence, a clear goal, and the ability to iterate when things get complicated. The real breakthrough happens when you push yourself to do the hard thing. As AI evolves, the timeless truth remains: no worthwhile output comes without effort.